
Page 29 - ISAKOS 2018 Winter Newsletter
P. 29
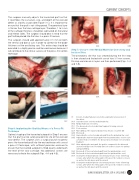
The surgeon manually adjusts the harvested graft so that it resembles the curvature, size, and depth of the excised defect as closely as possible (Figure 3-C). It is important to ensure that the graft is not sitting proud. The periosteal layer is thinner than the talar cartilage layer. Therefore, 1 to 2 mm of the cartilage thickness should be subtracted on the lateral and inferior sides. The surgeon should bear in mind that the graft will be placed into the talus in a press-fit manner.
The surgeon should add approximately 0.5 mm on both the ventral and dorsal cuts in order to correct for the blade thickness of the oscillating saw. This entire step should be executed in a highly precise and focused manner because it will contribute to the clinical success of the press-fit insertion technique.
04A 04B
Step 7: Closure of the Medial Malleolar Osteotomy and Incision Sites
The osteotomy site that was created during the first step is then closed and fixated with use of two 3.5-mm screws. Rinsing and closure in layers are then performed (Figs. 5-A and 5-B).
03B
Step 6: Implanting the Graft by Means of a Press-Fit Technique
03C
01 Incision, medial malleolar osteotomy, exploration and excision of the defect.
01A Curved incision over the medial malleolus.
01B Medial malleolar osteotomy.
01C The diseased osteochondral talar fragment is being excised.
01D Post-excision
02A Microdrilling of the subchondral bone by means of a 2mm drill
02B End result.
03A Harvesting the osteochondral autograft from the ipsilateral iliac crest 03B Adjusting the harvested autograft from the ipsilateral iliac crest in such
a manner that is resembles the diseased excised talar osteochondral
fragment.
03C After adjusting the autograft, the graft is compared to the diseased
and excised talar osteochondral defect in order to assure for optimal
sizing and fitting.
04A End result of the inserted autograft from the ipsilateral iliac crest. 04B End result of the inserted autograft from the ipsilateral iliac crest. 05A Closing the medial malleolar osteotomy by means of two 3.5mm lag
screws, after which the retinaculum of the post. tib. tendon is closed,
as well as the skin layers and the wound.
05B Closing the medial malleolar osteotomy by means of two 3.5mm lag
screws, after which the retinaculum of the post. tib. tendon is closed, as well as the skin layers and the wound.
Optimal shaping of the harvested autograft in Step 5 ensures that the graft can be safely placed into site of the excised talar defect. The surgeon uses a surgical punch to gently press the harvested graft into the excised lesion with use of a press-fit technique, with sufficient precision and care to ensure that the inserted autograft is fitted exactly underneath the level of the talar cartilage. No additional screws are necessary to fixate the autograft (Figs. 4-A and 4-B).
03A
CURRENT CONCEPTS
        05A 05B
 ISAKOS NEWSLETTER 2018: VOLUME I 27
